Installing Jekyll on Windows 7 Pro
09 Mar 2014
This is a combination of several articles so I can’t claim that this is all my own work. For example …
So let’s begin …
Install Ruby
- Go to http://rubyinstaller.org/downloads/
- I chose rubyinstaller-1.9.3-p545.exe which works fine on my system
- Once downloaded install it. Try to keep to the default directory which in this case is (C:\Ruby193) and make sure you tick Add Ruby executables to your PATH checkbox so the PATH environment variable will be updated automatically
- Open up a command prompt window and test if the installation has succeeded or not by typing in the following ruby -\-version
Install the Ruby DevKit
- Go to http://rubyinstaller.org/downloads/
- Download the installer that matches the Windows architecture and the Ruby version just installed. For instance Ruby versions 1.8.6 to 1.9.3 should use the file DevKit-tdm-32-4.5.2-20111229-1559-sfx.exe
- Run the installer and extract it to a folder e.g. C:\RubyDevKit
- To initialize and create the config.yml file open a command prompt window and type in the following
- cd C:\RubyDevKit
- ruby dk.rb init
- notepad config.yml
- In the opened notepad window add a new line - C:/Ruby193 at the end if it isn’t already there, then save and close.
- Back to the command prompt type in the following to review (optional) and install
- ruby dk.rb review
- ruby dk.rb install
Install Jekyll
At the time of writing a default install will give you version 1.4.3 of Jekyll however Windows 7 Pro doesn’t seem to like that version so we need to drop back to version 1.4.2.
- Open a command prompt window and type in the following
- gem -\-version (optional to verify that gem has been installed properly)
- gem install jekyll -\-version "=1.4.2"
Update Ruby Pygments Gem
If you don’t plan to show any code blocks on your site then you can skip this step. By now you should have Pygments version 0.5.4 installed (check in C:\Ruby193\lib\ruby\gems\1.9.1\gems) however once again Windows 7 doesn’t seem to like this version so we must first uninstall version 0.5.4 then install version 0.5.0
- Open a command prompt window and type in the following
- gem uninstall pygments.rb -\-version "=0.5.4"
- gem install pygments.rb -\-version "=0.5.0"
Install Python
- Go to http://www.python.org/download/
- Download appropriate version of Python windows installer e.g. I chose Python 2.7.6 Windows Installer (python-2.7.6.msi)
- Install accepting all the defaults
- Add the installation directory (e.g. C:\Python27) to the PATH environment variable. You should also add C:\Python27\Scripts which is used later.
- Open up a new command prompt window (this will avoid you having to reboot the PC so the PATH changes can be implemented) and test if the installation has succeeded or not by typing in the following python -\-version
Install Python ‘Easy Install’
- Go to https://pypi.python.org/pypi/setuptools#windows-7-or-graphical-install
- Download ez_setup.py as instructed and place it in the C:\Python27 folder
- Using the command prompt window you open before type in the following
- cd C:\Python27
- ez_setup.py
- Once installed add the ‘Python Scripts’ directory (C:\Python27\Scripts) to the PATH environment variable if you didn’t do it beforehand
Install Python Pygments
- Verify easy_install is installed properly easy\_install -\-help
- Install Pygments using easy_install easy\_install Pygments
Extras
The second link I posted at the top of this article has a few troubleshooting tips. The only error I received wasn’t among them but with the power of Google I was able to find a fix.
C:/Ruby193/lib/ruby/site_ruby/1.9.1/rubygems/custom_require.rb:36:in `require’: cannot load such file – wdm (LoadError)
To fix this issue open a command prompt and type in the following gem install wdm
The only other option I installed was the use of Kramdown. This is entirely optional but if you want to install it open a command prompt and type in the following gem install kramdown
Testing
OK if you’ve followed the instructions above hopefully you’ll have a fully working environment in which to run a Jekyll site locally which you can use for development / testing prior to uploading to your GitHub site. In my case I’d do the following
- Open Windows Explorer and find the folder containing my site
- Hold down the SHIFT key while clicking the right mouse button then select “Open command prompt here”
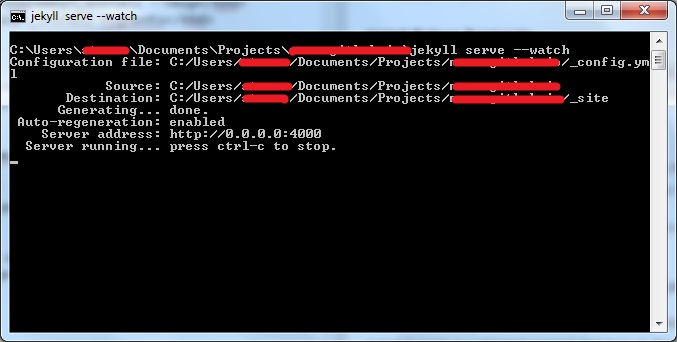
- At the command prompt type jekyll serve -\-watch (the --watch switch is optional but is useful when making changes as it rebuilds your site on the fly)
- If everything is alright then you should get something similar to this

Now open up your browser of choice and enter http://localhost:4000 into the address bar and you should see your site.